

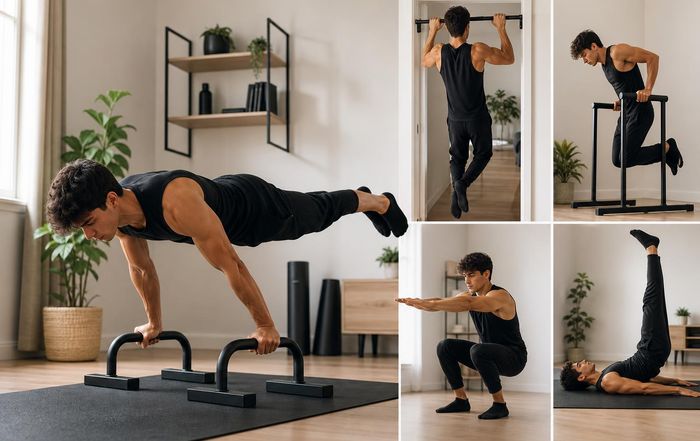
Beginner Calisthenics Skills You Can Practice at Home
Calisthenics strips training back to the basics: your body, gravity, and a bit of creativity. For beginners, that simplicity is exactly what makes it so effective-and easy to start at home, even with limited space and no equipment. The challenge is usually not "what to buy," but "what should I actually practice, and in what order, so I don't get hurt or overwhelmed?"
This guide focuses on foundational calisthenics skills you can safely build in a living room, bedroom, or small home gym. It emphasizes technique, progressions, and realistic expectations rather than flashy moves that demand a pull-up bar park or years of training.
Why Calisthenics Is So Beginner-Friendly
At its core, calisthenics is about mastering movement patterns-pushing, pulling, squatting, hinging, and bracing-using your body weight as resistance. That makes it a natural entry point for people who want to get stronger, move better, and build muscle without committing to a full gym setup.
Organizations like the American College of Sports Medicine highlight bodyweight exercise as a safe and effective way to improve strength and endurance when properly progressed and performed with sound technique (https://www.acsm.org/). Because you control the range of motion and leverage, you can usually adjust difficulty simply by changing your body angle or support points. This is ideal for home training, where you might be working around limited equipment, old injuries, or long breaks from exercise.
For sports fans interested in broader training ideas beyond calisthenics, our fitness, training, and physical sections explore different ways to structure workouts, mix cardio and strength, and stay consistent over time.
Setting Up a Safe Home Space
Before diving into specific skills, it is worth taking a moment to set up a safe, practical training area. You do not need much: a couple of square meters of floor, a sturdy chair or sofa edge, and ideally a free wall. A yoga mat or folded rug can help protect your wrists and knees during floor work, but a firm, non-slippery surface is more important than softness.
Health authorities such as the World Health Organization recommend adults aim for at least 150-300 minutes of moderate-intensity activity per week, including muscle-strengthening activities on two or more days (https://www.who.int/). Home calisthenics can cover that strength component if you treat it with the same seriousness you would a gym routine: warm up, focus on technique, and progress gradually. A brief dynamic warm-up-arm circles, leg swings, hip circles, and a few easy squats and wall push-ups-prepares joints and raises body temperature with minimal time investment.
If you are new to exercise, managing a chronic condition, or returning after a long break, organizations such as the NHS in the UK and the Centers for Disease Control and Prevention in the US advise consulting a healthcare professional before starting a new program (https://www.nhs.uk/, https://www.cdc.gov/). This is especially relevant if you experience chest pain, dizziness, unexplained shortness of breath, or joint issues during daily activities.
Foundational Skill 1: Plank Variations for Core Control
For calisthenics, core strength is not just about visible abs-it is about the ability to stabilize your spine while arms and legs move. The plank is a fundamental skill that teaches this "bracing" pattern and carries over to push-ups, handstands, and more advanced skills.
A basic forearm plank starts face-down on the floor, elbows under shoulders, forearms parallel, and legs extended. The key is to maintain a straight line from head to heels while lightly tucking the pelvis, engaging the glutes, and drawing the ribcage down so the lower back does not sag. Many beginners unconsciously hold their breath; instead, aim for steady, controlled breathing through the nose or light mouth exhale. When done correctly, you should feel tension across the midsection, not sharp pain in the lower back.
If a full plank feels too challenging, elevate your hands or forearms on a sofa, bench, or sturdy table. Elevation reduces the load and allows you to practice proper alignment before progressing. On the other hand, if a basic plank becomes easy beyond 45-60 seconds, you can experiment with shoulder taps (from a high plank), slow mountain climbers, or "stir the pot"-style movements on a cushion or instability surface, always prioritizing control over speed. Our wellness section often returns to this idea of quality over quantity-especially relevant when training alone at home without a coach's eye.
For deeper background on core training and spine safety, resources from organizations like the National Strength and Conditioning Association and university exercise science departments such as Harvard Health Publishing offer accessible overviews of evidence-based approaches (https://www.nsca.com/, https://www.health.harvard.edu/).
Foundational Skill 2: Push-Up Progressions for Upper-Body Strength
Push-ups are the cornerstone pushing movement in calisthenics, targeting the chest, shoulders, triceps, and core. They also teach body tension and shoulder stability in a way that translates to more advanced skills like dips and handstand work. However, full floor push-ups are often too difficult for beginners, leading to poor form and frustration.
A more accessible starting point is the wall push-up. Stand about an arm's length from a wall, place your hands slightly wider than shoulder-width, and lower your chest toward the wall while keeping your body in a straight line. Once you can do 15-20 controlled repetitions with a full range of motion and no discomfort, progress to an incline push-up with your hands on a sturdy surface like a countertop, table, or bench. Reducing the incline over time gradually increases the load until you are ready for floor push-ups.
On the floor, focus on hand placement under or slightly outside the shoulders, fingers spread for stability, and elbows tracking at roughly 30-45 degrees from the torso rather than flared straight out. Lower under control until your chest is just above the ground, then press back up while maintaining a rigid plank position. If full push-ups remain out of reach, you can also use "eccentric" reps-lowering slowly from the top, then dropping knees to return to the start-to build strength through the hardest portion of the movement.
Coaching guides from organizations like ACE (American Council on Exercise) and ExRx.net provide detailed cues and common error corrections for push-ups and their variations (https://www.acefitness.org/, https://exrx.net/). For broader upper-body training ideas that complement push-ups, you can explore our training and fitness coverage.
Foundational Skill 3: Squats and Lunges for Lower-Body Strength
Calisthenics is sometimes associated mainly with upper-body feats, but strong legs and hips are non-negotiable for athletic movement, injury prevention, and everyday function. Bodyweight squats and lunges are the primary skills to master at home, and they also build the foundation for more advanced moves like pistol squats or jump variations.
A basic bodyweight squat begins with feet roughly shoulder-width apart and toes slightly turned out. Initiate the movement by bending at hips and knees simultaneously, as if sitting back into a chair, while keeping the chest lifted and knees tracking in line with the toes. Depth will vary by individual hip and ankle mobility; aim for control and joint alignment rather than forcing a deep squat. If balance is an issue, holding onto a doorframe or countertop for light support can help you learn the pattern.
Lunges introduce unilateral (single-leg) strength and stability. From a standing position, step one foot forward, lower the back knee toward the floor under control, then push through the front heel to return to standing. You can adjust the length of your step to find a comfortable hip and knee angle. Beginners often benefit from "split squats," where the feet remain in a staggered stance and you move up and down without stepping each rep, which reduces coordination demands.
Guidelines from groups like The American Council on Exercise, Mayo Clinic, and national health services emphasize that knee pain during squats and lunges is usually a sign to adjust form, range of motion, or volume rather than to abandon the movements altogether (https://www.mayoclinic.org/). If discomfort persists, professional assessment is advisable. For readers interested in how lower-body strength work connects with running, cycling, or sports, our sports and physical sections provide additional context.
Foundational Skill 4: Glute Bridge and Hip Hinge Patterns
Many people spend large parts of the day sitting, which can leave the glutes underactive and the lower back overworked. The glute bridge and hip hinge patterns address this by teaching you to load and extend the hips rather than relying on the spine for movement, a crucial skill for both calisthenics and everyday tasks like lifting objects from the floor.
To perform a glute bridge, lie on your back with knees bent, feet flat and hip-width apart, and arms by your sides. Brace your core lightly, then drive through your heels to lift your hips until your body forms a straight line from shoulders to knees. Squeeze the glutes at the top without excessively arching the lower back, then lower slowly under control. If you feel this primarily in your hamstrings or lower back, experiment with bringing your feet slightly closer or further from your body and ensure you are actively contracting the glutes throughout.
Once a basic bridge is comfortable, you can progress to single-leg bridges, marching bridges (alternating leg lifts while holding the bridge), or hip thrusts with your shoulders elevated on a sofa or bench. These variations increase the challenge and prepare you for more dynamic hip-dominant movements such as hip hinges and eventually bodyweight good mornings or Nordic-style hamstring work.
Educational materials from institutions like Cleveland Clinic and Johns Hopkins Medicine often highlight glute and hip strengthening in their back-pain prevention advice (https://my.clevelandclinic.org/, https://www.hopkinsmedicine.org/). Integrating glute bridges into a home calisthenics routine can therefore support both performance and long-term joint health.
Foundational Skill 5: Hollow Body and Arch Holds for Full-Body Tension
As calisthenics skills progress, the ability to create and maintain full-body tension becomes increasingly important. Two simple but powerful positions-the hollow body hold and the arch (or "superman") hold-teach you to control the front and back of the body respectively, which carries over to pull-ups, levers, and handstands.
The hollow body hold starts lying on your back, arms extended overhead and legs straight. Gently press your lower back into the floor, engage your abs, and lift your head, shoulders, and legs a few centimeters off the ground, creating a subtle banana shape. The priority is maintaining contact between the lower back and floor; if it arches, reduce the lever by bending the knees, bringing arms to the sides, or lowering the legs. Short, high-quality holds of 10-20 seconds with full control are more valuable than long, shaky efforts.
The arch hold is the complementary pattern. Lying face-down with arms extended in front and legs straight, simultaneously lift the chest and thighs off the floor while squeezing the glutes and upper back. Avoid excessive neck extension by looking slightly ahead rather than up. This trains the posterior chain and helps balance the strong anterior focus of many bodyweight exercises.
Gymnastics-inspired training resources, including materials from USA Gymnastics and various national gymnastics federations, frequently emphasize these shapes as prerequisites for more complex skills (https://usagym.org/). For home practitioners, they are low-risk, equipment-free ways to develop awareness and strength across the whole body.
Foundational Skill 6: Assisted Rows and Doorframe Pulls (When Safe)
Pure pulling strength is harder to train at home without a bar or rings, but some beginner-friendly options exist. If you have a sturdy table that will not tip, you can perform inverted rows by lying underneath, gripping the edge, and pulling your chest toward it. Many people, however, do not have furniture designed for that kind of load, so safety must come first.
One accessible alternative is a towel or bedsheet row anchored securely around a solid post or banister, allowing you to lean back and pull your chest toward your hands. The more upright your body, the easier the movement; walking your feet further forward increases the challenge. It is critical that whatever you anchor to is structurally sound and not likely to move or break. Avoid using door handles or lightweight interior fixtures.
Some calisthenics communities suggest doorframe pull-ups using portable bars, but consumer safety agencies and groups like Consumer Reports have raised concerns about low-quality equipment or improper use leading to falls (https://www.consumerreports.org/). If you choose to invest in a pull-up bar, prioritize reputable brands, respect weight limits, and follow installation instructions closely. For readers exploring equipment choices or home-gym basics, our lifestyle and business coverage occasionally examines the broader fitness industry and product trends.
When in doubt, it is better to under-load pulling movements at home and supplement with resistance bands or occasional gym visits than to risk injury with improvised setups.
Foundational Skill 7: Balance and Coordination Drills
Calisthenics is not only about strength; balance and coordination are equally important, especially as skills become more dynamic. Simple single-leg balance drills, such as standing on one foot with the opposite knee raised, can be done almost anywhere and require no equipment. To increase difficulty, you can close your eyes, turn your head side to side, or perform gentle reaches with the free leg or arms.
Another valuable pattern is the "beast" or quadruped position: hands under shoulders, knees under hips, and knees hovering a few centimeters off the floor. Moving slowly forward, backward, and side to side from this position trains shoulder stability, core control, and coordination in a low-impact way. It also serves as a stepping stone toward more advanced locomotion patterns like bear crawls or crab walks.
Sports science literature, including work collected by organizations such as FIFA and World Rugby, often highlights balance and neuromuscular training as key factors in reducing lower-limb injury risk (https://www.fifa.com/, https://www.world.rugby/). Even if your goal is simply to move better in daily life rather than compete in sport, brief balance drills can support joint resilience and body awareness.
Structuring a Simple Beginner Home Calisthenics Session
Putting individual skills together into a coherent session helps ensure you are training the whole body and progressing over time. A straightforward structure for beginners might include a short warm-up, 4-6 core movements, and a brief cool-down. For example:
Warm-up: 5-8 minutes of dynamic movements (arm circles, leg swings, light squats, wall push-ups).
Main skills: a push variation (wall or incline push-ups), a squat or lunge, a core hold (plank or hollow body), a hip-dominant movement (glute bridge), a pulling option if safely available, and a balance or quadruped drill.
Cool-down: gentle stretches for hips, chest, shoulders, and back.
Working in circuits-performing one set of each exercise back-to-back, resting briefly, and repeating 2-4 times-keeps sessions time-efficient and slightly elevates heart rate for a conditioning effect. As you improve, you can increase total sets, extend hold times, or move to more challenging variations, but it is wise to change only one variable at a time. Our health and wellness sections frequently address recovery, sleep, and stress management, which all influence how quickly you can safely progress.
For additional planning guidance, public-health agencies like the US Department of Health and Human Services and Health Canada publish physical-activity recommendations that can help you frame how often and how hard to train each week (https://www.hhs.gov/, https://www.canada.ca/).
Recovery, Nutrition, and Habit-Building
Even at a beginner level, your body adapts between sessions, not during them. Adequate sleep, hydration, and nutrition support that adaptation. While calisthenics alone can improve strength and muscle tone, combining it with balanced eating patterns-emphasizing whole foods, sufficient protein, and appropriate energy intake-will make progress smoother. Evidence-based guidance from organizations like the Academy of Nutrition and Dietetics can be a useful starting point (https://www.eatright.org/). For more applied coverage, explore our nutrition and health pages.
Habit-building is equally important. Starting with three short sessions per week is usually more sustainable than aiming for daily, exhaustive workouts that quickly feel like a chore. Tracking a few simple metrics-total sets, hold times, or the incline height of your push-ups-helps make progress visible, which in turn reinforces motivation. If you have a wearable device or app, tools from companies like Garmin, Polar, or Apple can assist with logging activity and monitoring overall movement patterns (https://www.garmin.com/, https://www.polar.com/, https://www.apple.com/).
Finally, remember that calisthenics is a long game. The beginner skills outlined here might not look as impressive as advanced levers or handstand push-ups, but they are the groundwork that makes those moves possible and safe down the line. With consistent practice, gradual progression, and attention to recovery, a simple home routine can evolve into a powerful, sustainable way to stay strong and healthy for years.